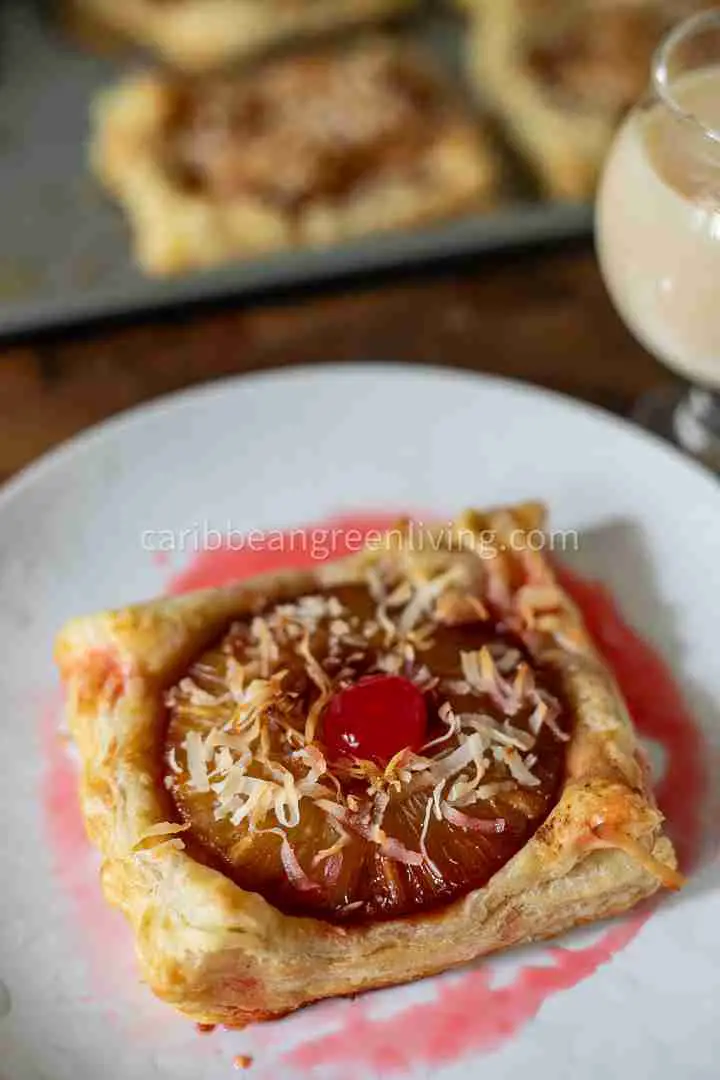
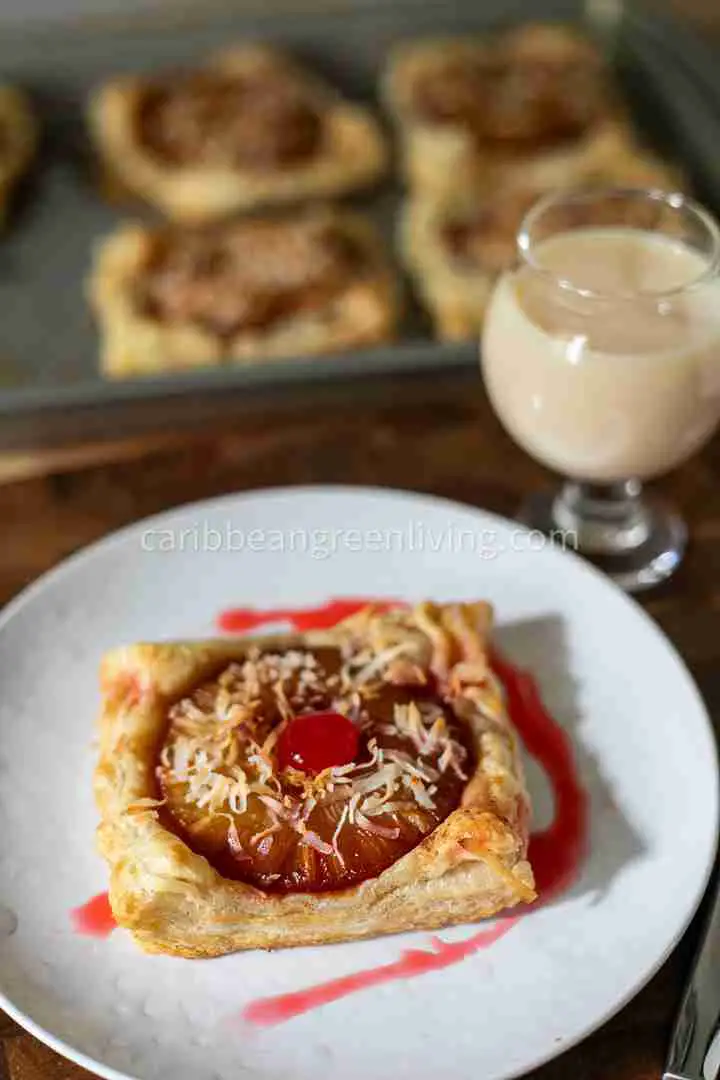
Sweet and Tropical Caramelized Pineapple Tartlets
Indulge in a taste of the tropics with these delightful Caramelized Pineapple Tartlets!
Crispy, golden filo wrapped around sticky-sweet pineapple slices, lightly spiced and caramelized to perfection. Whether you’re planning a breezy island-style brunch, a vibrant Caribbean dessert table, or just need a midweek tropical escape, these tartlets will bring sunshine to your kitchen—no matter the weather outside.
This recipe is adapted from Jamie Oliver’s Caramelized Pineapple Tartlets, with a few tropical twists and ingredient substitutions to bring it closer to Caribbean-inspired kitchens.
Why You’ll Love This Recipe
- Easy but fancy – These tartlets look impressive, but they’re simple enough for a casual baking session.
- Tropical flavors galore – Pineapple, coconut, nutmeg, and a cherry on top? Yes, please!
- Great for gatherings – These bite-sized beauties are made for sharing.
- Dairy-free and adaptable – Use your fave plant-based milk and even make them nut-free if you’d like.
Ingredient Spotlight: What You’re Working With
Before you whip out the filo, let’s take a closer look at what makes this recipe so special:
- Coconut Sugar – Adds a mellow, caramel-like sweetness that pairs beautifully with pineapple. Plus, it’s a less-refined option.
- Ground Ginger – Just a hint adds a warm, zesty background without overpowering the tropical notes.
- Canned Pineapple Rings in Juice – Convenient, juicy, and already the perfect shape for tartlets. Choose “no sugar added” to keep it balanced.
- Desiccated Coconut – Adds texture and that unmistakable island flavor. Toast some extra to sprinkle on top!
- Cassava Flour – A gluten-free, tropical-friendly flour made from the cassava root. It’s slightly nutty and holds the batter beautifully.
- Vanilla Bean Paste – Rich, aromatic, and full of real vanilla specks—it elevates the filling.
- Oat Milk – Creamy and neutral. A great dairy-free choice, but see substitutes if you want to mix it up.
- Filo Pastry – Paper-thin layers that bake up crispy and golden. Just remember: keep it covered with a damp towel when working, or it dries out fast!
- Olive Oil – For brushing the filo instead of butter. Keeps things light and adds richness.
- Whole Nutmeg – Freshly grated for big, bold flavor. A little goes a long way.
- Jarred Cherries in Syrup – The glossy finishing touch that makes these tartlets extra pretty (and extra tasty).
- Coconut Yogurt or Vanilla Ice Cream – To serve, of course. Because warm tartlets with cold creaminess? Yes. Always.
Ingredient Substitution Spotlight: Puff Pastry vs. Phyllo Dough
You’ve got options, my friend—and here’s the lowdown so you can bake with confidence:
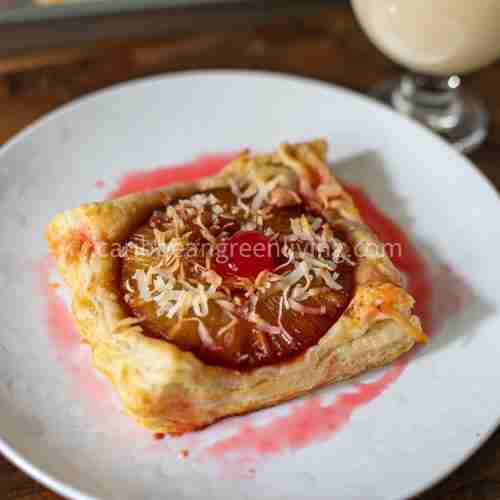
- Puff Pastry (used in the images) is rich, flaky, and buttery. It puffs up into layers as it bakes, making each bite feel indulgent and golden. It’s easier to handle (no delicate sheets tearing in your hands), and you don’t need to layer it unless you want to go full-on flaky fabulous.
- Phyllo Dough is ultra-thin and bakes up light and crispy. It gives that crackly crunch and is more traditional for layered pastries. If you go with phyllo, you’ll want to stack and oil each layer like in the original recipe steps.
My take? Use what you’ve got! Puff pastry gives a heartier, more rustic tartlet vibe. Phyllo is crisp and delicate. You can’t go wrong—just adjust your baking time accordingly. Puff pastry takes longer to cook through (add 10–15 extra minutes), while phyllo is usually good to go in about 20 minutes.
Notes and Tips for the Caramelized Pineapple Tartlets
- Coconut Sugar Texture Tip: If you’re using coconut sugar, just know that your syrup won’t be as thick or sticky as one made with regular sugar—and that’s totally okay! It’ll still taste amazing, just a little lighter.
- Cold Dough Is Happy Dough: It’s best to prep your dough when it’s nice and cold. That way, it slices cleanly and behaves better when you’re folding those cute little tartlet edges.
- No Puffing, Please: Give your dough a few pokes with a fork before baking. It helps release steam and keeps everything from puffing up like a blowfish.
- Sweet Tooth Approved: Want a little extra caramelized crunch? Go ahead and sprinkle a touch more coconut sugar on top before sliding the tray into the oven.
- DIY Desiccated Coconut: No desiccated coconut in your pantry? No problem! Toss some unsweetened coconut flakes in the food processor and give it a few pulses until it resembles flour. I like to leave mine a little chunky for texture, but go as fine as you like.
- No Filo? Puff Pastry to the Rescue!: I actually used puff pastry for the tartlets shown in the images, instead of filo dough. Here’s the scoop: puff pastry is buttery, thicker, and gives you a more substantial, flaky bite. Filo, on the other hand, is much thinner and crispier, with a lighter, more delicate crunch. Either one works—just adjust your bake time accordingly.
- Layering is Optional: With puff pastry, you can choose to layer your dough or not. Since it’s already thicker than filo, you might only need one layer. If you do layer, make sure to keep the dough cold and roll it lightly if needed.
- Transfer Trick: Use a long knife or a cake flat spatula to lift the uncooked tartlets and place them gently onto your baking pan without tearing the dough or disturbing the filling.
- Avoid Sticky Situations: These tartlets like to cling to the pan! Use parchment paper lightly oiled with olive oil instead of placing them directly on the tray.
- Foil Fix: If you notice the bottom or middle layer of your dough (especially with puff pastry) isn’t fully cooked after the first bake, cover the tartlets with aluminum foil, move the tray to the upper shelf, and bake for another 10 minutes or so.
- Timing Reminder: The original 20-minute baking time is perfect for filo dough. Puff pastry needs more time, so add extra bake time—usually 10 to 15 more minutes, depending on your oven.
- Corner-First Folding: When folding the tartlet edges, pinch the corners first to lock in the shape, then fold the sides casually up for that rustic, island-chic look.
- Cherry on Top: Add the cherries just before serving so they stay bright, juicy, and perfectly perched on top.
Ingredient Swaps & Substitutes
Ground Almond Substitutes:
- Other Nuts:
- Hazelnuts, Cashews, or Macadamia Nuts – all mild, all delicious.
- Nut-Free Options:
- Coconut flour (use 1/3 to 1/4 the amount),
- Oat flour (1:1 swap),
- Flaxseed flour,
- All-purpose or gluten-free blends.
- Other possibilities:
- Breadcrumbs, semolina, cornmeal, or buckwheat flour.
Milk Alternatives:
- Soy Milk – Protein-rich and creamy.
- Almond Milk – Subtle and slightly sweet.
- Oat Milk – Our fave for baking!
- Other Options: Coconut milk, hemp milk, rice milk (just watch the flavor).
Suggested Pairings
These Caramelized Pineapple Tartlets are a little sunshine in every bite—and even better when paired with:
- Coconut yogurt or vanilla ice cream – because warm tartlets and cold creamy scoops are a love story.
- Haitian Kremas (Cremas) – this rich, spiced coconut liqueur is made for tropical desserts like this. The flavors complement each other beautifully, especially with the nutmeg and coconut notes in the tartlets.
- Cherry liqueur or syrupy Amarena cherries – a boozy cherry drizzle or side sipper really elevates the tart’s fruity richness.
- A glass of sparkling rosé or Prosecco – if you’re feeling fancy, the bubbles are a refreshing contrast to the caramelized sweetness.
- Strong Haitian coffee or espresso – for a bold, earthy balance to the sweetness and a cozy Caribbean coffeehouse moment at home.
Final Thoughts
And there you have it—a little taste of the tropics wrapped in golden, flaky filo and bursting with sweet pineapple goodness. These Caramelized Pineapple Tartlets are the perfect fusion of fruity, crunchy, and creamy, and they’re just fancy enough to impress without causing a kitchen meltdown. Whether you’re serving them at a weekend brunch, dressing up a weeknight dessert, or just need something fun and fruity in your life, this one’s a keeper.
Don’t forget—this recipe is adapted from a Jamie Oliver classic, but with a tropical twist that makes it right at home on your Caribbean-inspired table. Try it with coconut yogurt for a lighter touch or go all in with vanilla ice cream. Either way, you’ll be hooked from the first bite.
If you make these tartlets, snap a pic, tag us on social (@Noubess-Caribbean), and spread the sweet sunshine. Happy baking!
Sweet and Tropical Caramelized Pineapple Tartlets
Ingredients
- 2 tablespoons coconut sugar
- ⅛ teaspoon ground ginger
- 1 x 20oz can pineapple rings in juice no sugar added
- ¼ cup desiccated coconut plus extra for sprinkling
- ¼ cup cassava flour
- 1 teaspoon vanilla bean paste
- ¼ cup oat milk or your preferred plant-based milk – see substitutes below
- 3 sheets of filo pastry cut into 4×4 inch squares
- Olive oil for brushing
- Whole nutmeg for grating
- 6 jarred cherries in syrup
- Coconut yogurt or vanilla ice cream to serve
Instructions
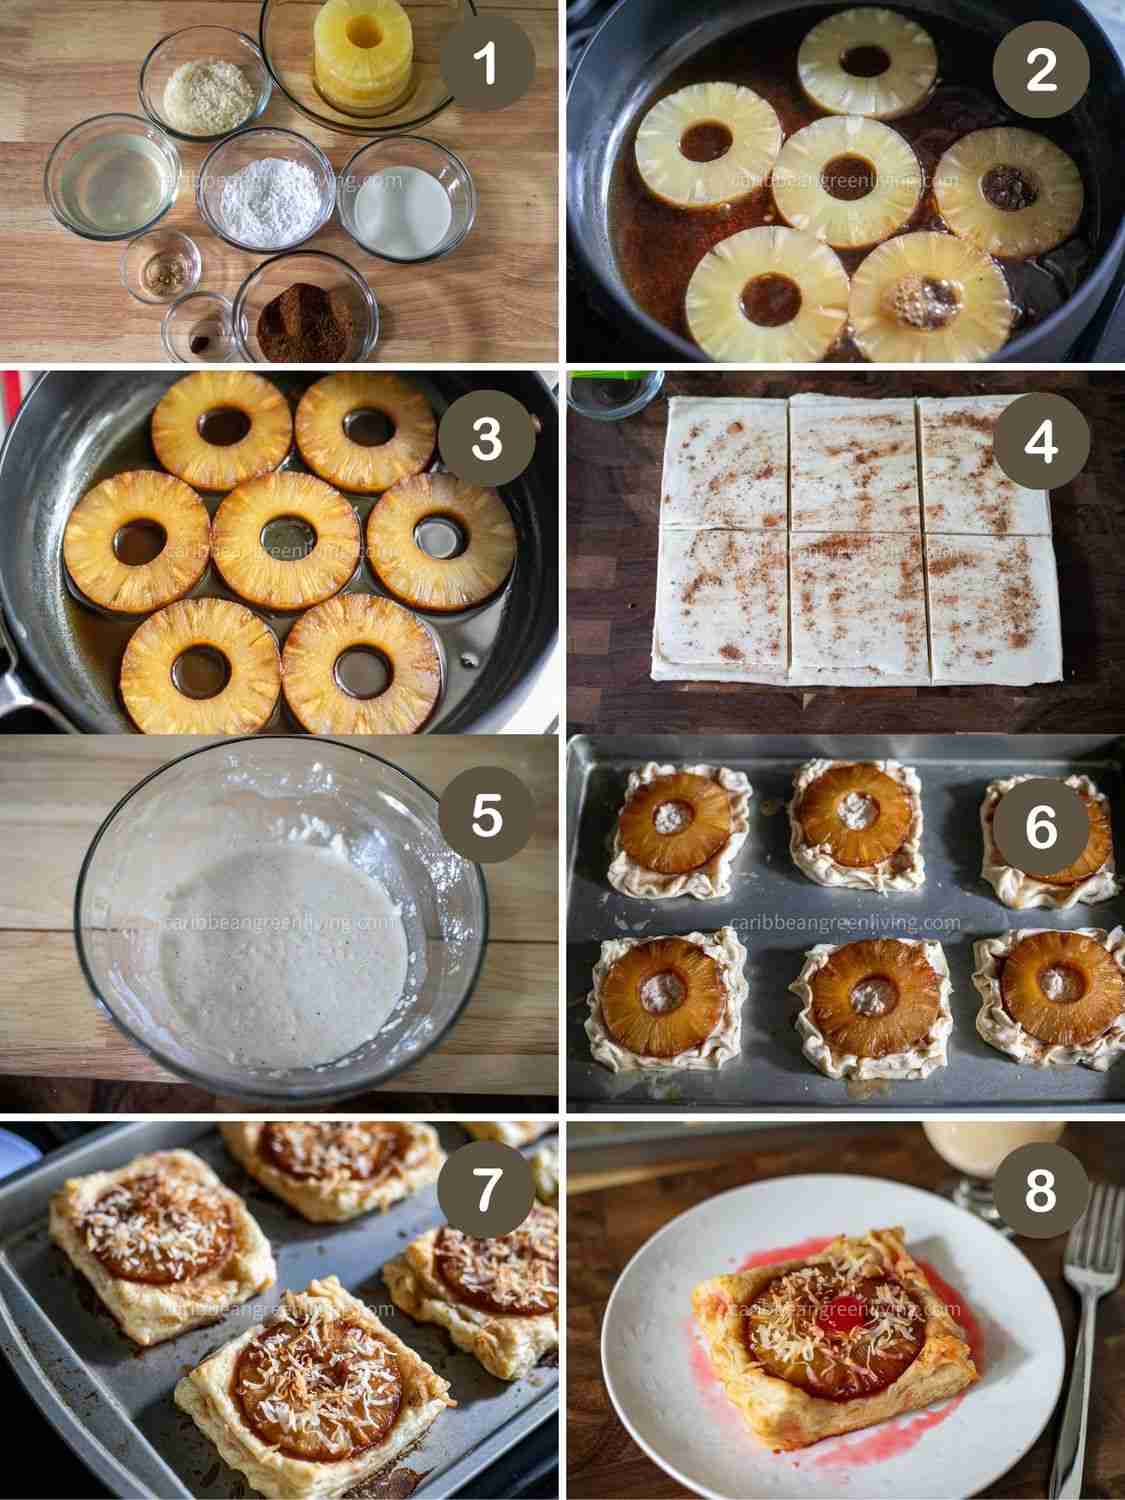
Caramelize that pineapple:
- In a large non-stick frying pan, sprinkle in the coconut sugar and pour in the pineapple juice (from the can) plus a splash of water. Bring it to a simmer. Add six pineapple rings and cook until golden on both sides and the syrup is thickened. Turn them gently and swirl them in the syrup occasionally. Once golden and sticky, remove from heat and let cool completely.
Make the filling:
- Whisk together the desiccated coconut, cassava flour, vanilla paste, and oat milk into a light, spoonable batter.
Layer your filo:
- Lay out one sheet, brush with olive oil, grate a little fresh nutmeg on top, and repeat until all three sheets are stacked. Then cut into 6 squares.
Assemble the tartlets:
- Spoon a little of the batter into the center of each square, top with a caramelized pineapple ring, and gently fold the filo edges around the fruit (no need to be perfect—it’s meant to look rustic and relaxed). Place on a lightly oiled baking tray. Sprinkle with extra coconut and spoon on any leftover syrup from the pan.
Bake to golden perfection:
- Preheat the oven to 180°C / 350°F / Gas 4. Bake on the bottom rack for 20 minutes, no more, no less!
Serve it up:
- Top each tartlet with a cherry and a drizzle of its syrup. Serve warm with a scoop of coconut yogurt or a scoop of vanilla ice cream for that ultimate island dessert vibe.
Notes
Gemma’s Tip:
The tartlets in the photos were made with puff pastry, not phyllo dough. If you’re using puff, you don’t need to stack layers unless you want to. Just remember—puff pastry is thicker, so give it a bit more oven time. Keep an eye on those golden edges!- Coconut Sugar Texture Tip: If you’re using coconut sugar, just know that your syrup won’t be as thick or sticky as one made with regular sugar—and that’s totally okay! It’ll still taste amazing, just a little lighter.
- Cold Dough Is Happy Dough: It’s best to prep your dough when it’s nice and cold. That way, it slices cleanly and behaves better when you’re folding those cute little tartlet edges.
- No Puffing, Please: Give your dough a few pokes with a fork before baking. It helps release steam and keeps everything from puffing up like a blowfish.
- Sweet Tooth Approved: Want a little extra caramelized crunch? Go ahead and sprinkle a touch more coconut sugar on top before sliding the tray into the oven.
- DIY Desiccated Coconut: No desiccated coconut in your pantry? No problem! Toss some unsweetened coconut flakes in the food processor and give it a few pulses until it resembles flour. I like to leave mine a little chunky for texture, but go as fine as you like.
- No Filo? Puff Pastry to the Rescue!: I actually used puff pastry for the tartlets shown in the images, instead of filo dough. Here’s the scoop: puff pastry is buttery, thicker, and gives you a more substantial, flaky bite. Filo, on the other hand, is much thinner and crispier, with a lighter, more delicate crunch. Either one works—just adjust your bake time accordingly.
- Layering is Optional: With puff pastry, you can choose to layer your dough or not. Since it’s already thicker than filo, you might only need one layer. If you do layer, make sure to keep the dough cold and roll it lightly if needed.
- Transfer Trick: Use a long knife or a cake flat spatula to lift the uncooked tartlets and place them gently onto your baking pan without tearing the dough or disturbing the filling.
- Avoid Sticky Situations: These tartlets like to cling to the pan! Use parchment paper lightly oiled with olive oil instead of placing them directly on the tray.
- Foil Fix: If you notice the bottom or middle layer of your dough (especially with puff pastry) isn’t fully cooked after the first bake, cover the tartlets with aluminum foil, move the tray to the upper shelf, and bake for another 10 minutes or so.
- Timing Reminder: The original 20-minute baking time is perfect for filo dough. Puff pastry needs more time, so add extra bake time—usually 10 to 15 more minutes, depending on your oven.
- Corner-First Folding: When folding the tartlet edges, pinch the corners first to lock in the shape, then fold the sides casually up for that rustic, island-chic look.
- Cherry on Top: Add the cherries just before serving so they stay bright, juicy, and perfectly perched on top.
Nutrition
Please keep in mind that nutritional information is a rough estimate and can vary greatly based on the products used.
Nutrition info is automatically generated and provided as a courtesy and as an estimate only.


